웹/리눅스 서버에서의 TLS / SSL 버전 확인 및 설정 방법 (SSL Labs)

요즘은 웹/리눅스 서버를 운영하면서
보안에 대한 인식이나 요구도가 높아지다 보니
각 프로토콜(Protocol)의 버전을 확인하고, 보안 프로토콜 등급을 올려주는 것이 좋습니다.
각 서버 운영 업체나 클라이언트들도 그렇게 요구를 하구요.
사실..이런 요구가 오기전에 미리미리 보안에 대한 중요성을 인식하고 대비하는 것이 더 좋겠죠.
TLS / SSL의 버전을 확인하는 방법은 크게 두가지로 구분됩니다.
- Openssl 명령어를 사용하는 방법
- Qualys SSL Labs. SSL Server Test
먼저,
Openssl 명령어를 이용해서 확인하는 방법을 알아봅니다.
[serviceWeb@web1 /etc/httpd/logs]
$ openssl
OpenSSL> s_client ?
unknown option ?
usage: s_client args

 -host host     - use -connect instead
 -port port     - use -connect instead
 -connect host:port - who to connect to (default is localhost:4433)
 -verify arg   - turn on peer certificate verification
 -cert arg     - certificate file to use, PEM format assumed
 -certform arg - certificate format (PEM or DER) PEM default
 -key arg      - Private key file to use, in cert file if
                 not specified but cert file is.
 -keyform arg  - key format (PEM or DER) PEM default
 -pass arg     - private key file pass phrase source
 -CApath arg   - PEM format directory of CA's
 -CAfile arg   - PEM format file of CA's
 -trusted_first - Use trusted CA's first when building the trust chain
 -reconnect    - Drop and re-make the connection with the same Session-ID
 -pause        - sleep(1) after each read(2) and write(2) system call
 -showcerts    - show all certificates in the chain
 -debug        - extra output
 -msg          - Show protocol messages
 -nbio_test    - more ssl protocol testing
 -state        - print the 'ssl' states
 -nbio         - Run with non-blocking IO
 -crlf         - convert LF from terminal into CRLF
 -quiet        - no s_client output
 -ign_eof      - ignore input eof (default when -quiet)
 -no_ign_eof   - don't ignore input eof
 -psk_identity arg - PSK identity
 -psk arg      - PSK in hex (without 0x)
 -ssl2         - just use SSLv2
 -ssl3         - just use SSLv3
 -tls1_2       - just use TLSv1.2
 -tls1_1       - just use TLSv1.1
 -tls1         - just use TLSv1
 -dtls1        - just use DTLSv1
 -fallback_scsv - send TLS_FALLBACK_SCSV
 -mtu          - set the link layer MTU
 -no_tls1_2/-no_tls1_1/-no_tls1/-no_ssl3/-no_ssl2 - turn off that protocol
 -bugs         - Switch on all SSL implementation bug workarounds
 -serverpref   - Use server's cipher preferences (only SSLv2)
 -cipher       - preferred cipher to use, use the 'openssl ciphers'
                 command to see what is available
 -starttls prot - use the STARTTLS command before starting TLS
                 for those protocols that support it, where
                 'prot' defines which one to assume.  Currently,
                 only "smtp", "pop3", "imap", "ftp" and "xmpp"
                 are supported.
 -engine id    - Initialise and use the specified engine
 -rand file:file:...
 -sess_out arg - file to write SSL session to
 -sess_in arg  - file to read SSL session from
 -servername host  - Set TLS extension servername in ClientHello
 -tlsextdebug      - hex dump of all TLS extensions received
 -status           - request certificate status from server
 -no_ticket        - disable use of RFC4507bis session tickets
 -nextprotoneg arg - enable NPN extension, considering named protocols supported (comma-separated list)
 -legacy_renegotiation - enable use of legacy renegotiation (dangerous)
 -use_srtp profiles - Offer SRTP key management with a colon-separated profile list
 -keymatexport label   - Export keying material using label
 -keymatexportlen len  - Export len bytes of keying material (default 20)
자~~ 위에서 사용법을 보셨죠?
우리가 확인하고 싶은 것은 프로토콜의 버전이므로... 다음의 인자들을 기억하시면 됩니다.
 -ssl2         - just use SSLv2
 -ssl3         - just use SSLv3
 -tls1_2       - just use TLSv1.2
 -tls1_1       - just use TLSv1.1
 -tls1         - just use TLSv1
 -dtls1        - just use DTLSv1
이걸 토대로 사이트의 프로토콜 버전을 확인하는 명령어를 만들어서 실행해 볼까요?
naver.com에 대한 것을 확인해보면... 다음과 같은 식으로 하면 되겠죠?
### SSL3 확인 ###
[shell]$ openssl s_client -connect naver.com:443 -ssl3

### TLSv1.2 확인 ###
[shell]$ openssl s_client -connect naver.com:443 -tls1_2

### TLSv1 확인 ###
[shell]$ openssl s_client -connect naver.com:443 -tls1

### DTLSv1.1 확인 ###
[shell]$ openssl s_client -connect naver.com:443 -dtls1
사이트의 SSL3 버전 확인 방법
naver.com의 SSL3 프로토콜 버전 확인을 해볼까요?
해당 명령어를 실행해보면 다음과 같은 결과를 보실 수 있습니다.
[shell]$ openssl s_client -connect naver.com:443 -ssl3
CONNECTED(00000003)
140157034440520:error:14094410:SSL routines:SSL3_READ_BYTES:sslv3 alert handshake failure:s3_pkt.c:1256:SSL alert number 40
140157034440520:error:1409E0E5:SSL routines:SSL3_WRITE_BYTES:ssl handshake failure:s3_pkt.c:596:
---
no peer certificate available
---
No client certificate CA names sent
---
SSL handshake has read 7 bytes and written 0 bytes
---
New, (NONE), Cipher is (NONE)
Secure Renegotiation IS NOT supported
Compression: NONE
Expansion: NONE
SSL-Session:
    Protocol  : SSLv3
    Cipher    : 0000
    Session-ID:
    Session-ID-ctx:
    Master-Key:
    Key-Arg   : None
    Krb5 Principal: None
    PSK identity: None
    PSK identity hint: None
    Start Time: 1658920386
    Timeout   : 7200 (sec)
    Verify return code: 0 (ok)
---
사이트의 TLSv1.2 확인 방법
특정 사이트에 대한 TLSv1.2 확인 방법
[shell]# openssl s_client -connect domain.com:443 -tls1_2
CONNECTED(00000003)
depth=2 C = BE, O = GlobalSign nv-sa, OU = Root CA, CN = GlobalSign Root CA
verify return:1
depth=1 C = BE, O = GlobalSign nv-sa, CN = AlphaSSL CA - SHA256 - G2
verify return:1
depth=0 CN = *.domain.com
verify return:1
139714331289416:error:100AE081:elliptic curve routines:EC_GROUP_new_by_curve_name:unknown group:ec_curve.c:316:
139714331289416:error:1408D010:SSL routines:SSL3_GET_KEY_EXCHANGE:EC lib:s3_clnt.c:1641:
---
Certificate chain
 0 s:/CN=*.domain.com
   i:/C=BE/O=GlobalSign nv-sa/CN=AlphaSSL CA - SHA256 - G2
 1 s:/C=BE/O=GlobalSign nv-sa/CN=AlphaSSL CA - SHA256 - G2
   i:/C=BE/O=GlobalSign nv-sa/OU=Root CA/CN=GlobalSign Root CA
 2 s:/C=BE/O=GlobalSign nv-sa/OU=Root CA/CN=GlobalSign Root CA
   i:/C=BE/O=GlobalSign nv-sa/OU=Root CA/CN=GlobalSign Root CA
---
Server certificate
-----BEGIN CERTIFICATE-----
MIIGPjCCBSagAwIBAgIMLch7HY3T0eRMEOB/MA0GCSqGSIb3DQEBCwUAMEwxCzAJ
.
.
중략
.
.
EPo1erQuvjEP1DTHx2PGo4bD
-----END CERTIFICATE-----
subject=/CN=*.domain.com
issuer=/C=BE/O=GlobalSign nv-sa/CN=AlphaSSL CA - SHA256 - G2
---
No client certificate CA names sent
---
SSL handshake has read 4115 bytes and written 0 bytes
---
New, (NONE), Cipher is (NONE)
Server public key is 2048 bit
Secure Renegotiation IS supported
Compression: NONE
Expansion: NONE
SSL-Session:
    Protocol  : TLSv1.2
    Cipher    : 0000
    Session-ID: 62E0EF9F76A0234350DE8BA9############8C959160F5084291260790
    Session-ID-ctx:
    Master-Key:
    Key-Arg   : None
    Krb5 Principal: None
    PSK identity: None
    PSK identity hint: None
    Start Time: 1658908575
    Timeout   : 7200 (sec)
    Verify return code: 0 (ok)
---
위에서는 openssl 명령어를 통해서 확인하는 방법을 알아봤구요.
보다 손쉽게 웹사이트를 통해서 확인하는 방법도 있습니다.
Qualys SSL Labs. SSL Server Test
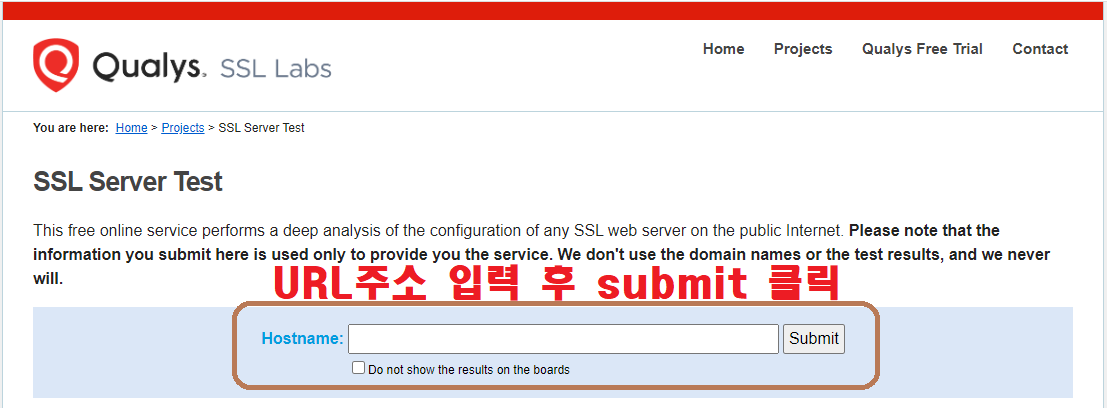
Qualys SSL Labs 사이트에 접속하셔서
확인하고자하는 웹사이트의 URL 주소만을 입력해주시면 됩니다.
접속하신 후 아래의 Hostname에 입력 하신 후 'Submit' 버튼을 누르시면 알아서 확인해줍니다.
자~~
제 티스토리 ( https://iamfreeman.tistory.com )에 대해서 분석해볼까요?
여러가지 프로토콜에 대해서 테스팅합니다~

Summary
SSL Report의 결과를 요약해서 보여줍니다.
- 사이트의 등급
- 각 분야의 취득 점수
- 해당 등급을 받게 된 이유
따끈한 결과 리포트가 나왔습니다.
이 모든게 공짜에요. 대박!!!
전체 등급을 보니 "B" 등급이네요.
왜 그런가보니... Protocol Support에서 점수를 많이 깍아 먹었어요.

왜 B등급을 받았는지를 아래의 표로 확인해볼까요?
2020년 1월 31일 이후부터는 TLSv1.0 or TLSv1.1을 제공할 경우 B 등급이래요.
자세한 내용은 아래 표를 참고하세요.
SSL Labs Grade Change for TLS 1.0 and TLS 1.1 Protocols
Update 1/31/2020: The grade change is now live on www.ssllabs.com. Servers that support TLS 1.0 or TLS 1.1 are capped to B grade.
Existing Grades Sample (기존 등급 샘플)
| Server Configuration | Grade |
| TLS 1.2, TLS 1.1, TLS 1.0 + HSTS + No Warning + TLS_FALLBACK_SCSV | A+ |
| TLS 1.2, TLS 1.1, TLS 1.0 + HSTS + No Warning + No support for TLS_FALLBACK_SCSV | A |
| TLS 1.2, TLS 1.1, TLS 1.0 + HSTS + Warnings + No support for TLS_FALLBACK_SCSV | A- |
Future Grades Sample (향후 등급 샘플)
| Server Configuration | Grade |
| TLS 1.2, TLS 1.1, TLS 1.0 + HSTS + No Warning + TLS_FALLBACK_SCSV | B |
| TLS 1.2, TLS 1.1, TLS 1.0 + HSTS + No Warning + No support for TLS_FALLBACK_SCSV | B |
| TLS 1.2, TLS 1.1, TLS 1.0 + HSTS + Warnings + No support for TLS_FALLBACK_SCSV | B |
| TLS 1.2 + HSTS + No Warning + TLS_FALLBACK_SCSV | A+ |
| TLS 1.2 + HSTS + No Warning + No support for TLS_FALLBACK_SCSV | A |
| TLS 1.2 + HSTS + Warnings + No support for TLS_FALLBACK_SCSV | A- |
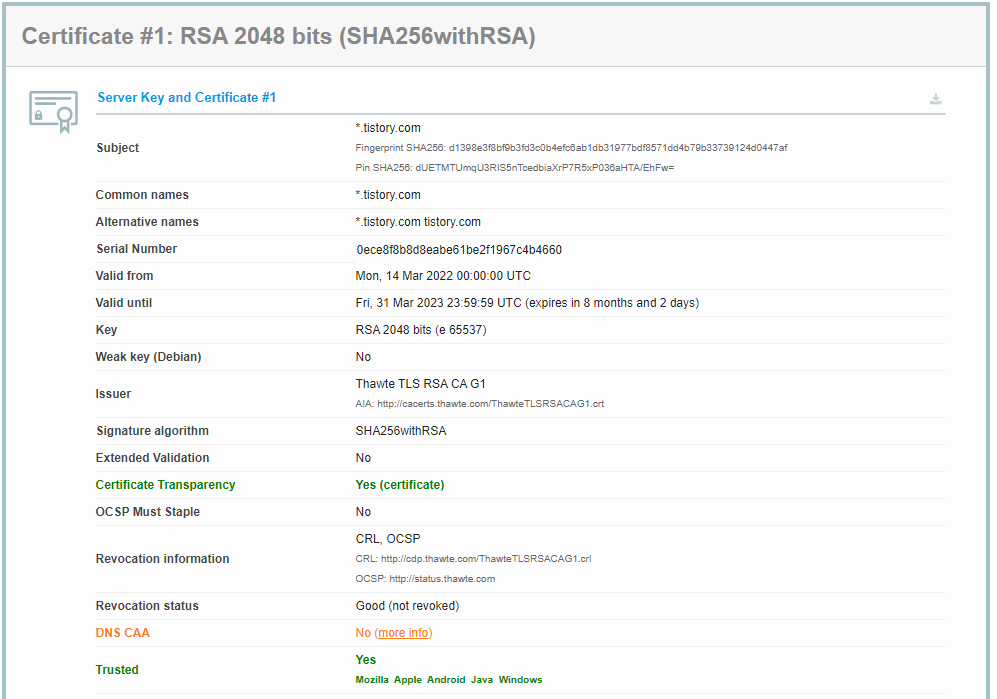
Certificate
SSL 인증서에 대한 정보를 보여줍니다.
사이트에 접속하면 주소창 왼쪽에 있는 자물쇠 모양을 클릭하시면 보이는 정보를 말합니다.


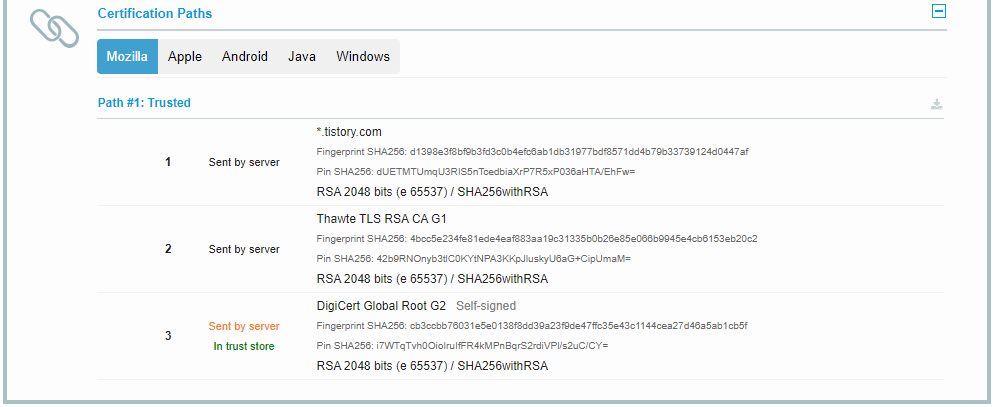
Additional Certificates
(if supplied)
만약에 제공된다면.... 추가적인 인증서의 정보들을 보여줍니다.

Certification Paths
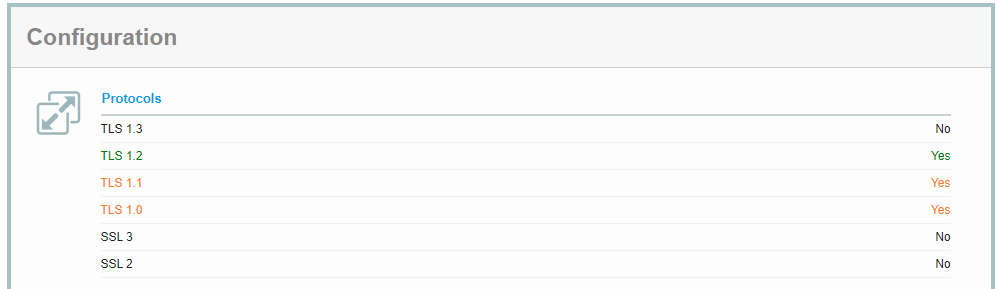
Configuration
우리가 보려고했던 Protocols의 정보가 보이는군요.
아래의 정보를 통해 어떠한 Protocol이 사용중인지 알 수 있습니다.
다들 잘 아시겠지만. ^^
해당 프로토콜의 값이
Yes면 사용중인 것이고,
No면 미사용중인 겁니다.
Cipher Suites
암호화 스위트(Cipher Suite)는 전송 계층 보안(Transport Layer Security, TLS)에서 쓰이는 인터넷 보안 보조 알고리즘이다. 일반적으로 다음과 같은 구조를 가지고 있다.
TLS 1.0/TLS 1.1/TLS 1.2
TLS_ECDHE_RSA_WITH_AES_128_GCM_SHA256
- TLS - 프로토콜(SSL/TLS)
- ECDHE - 키 교환방식
- RSA - 인증서 검증(Authentication)
- AES_128 - 대칭키를 이용한 블록 암호화 방식
- GCM - 블록 암호 운용방식
- SHA256 - 메시지 인증 (무결성)
TLS 1.3
TLS_AES_128_GCM_SHA256

Handshake Simulation
Handshake 에 대한 시뮬레이션 정보를 보여줍니다.
핸드셰이킹(handshaking), 주고받기는 정보기술과 전기통신 및 관련 분야에서 채널에 대한 정상적인 통신이 시작되기 전에 두 개의 실체 간에 확립된 통신 채널의 변수를 동적으로 설정하는 자동화된 협상 과정이다. 채널의 물리적인 확립이 잇따르며, 정상적인 정보 전송 이전에 이루어진다.

Protocol Details
Protocol의 상세 정보를 보여줍니다.
많이도 있네요.
근데.. 뭐 대부분이 No지?

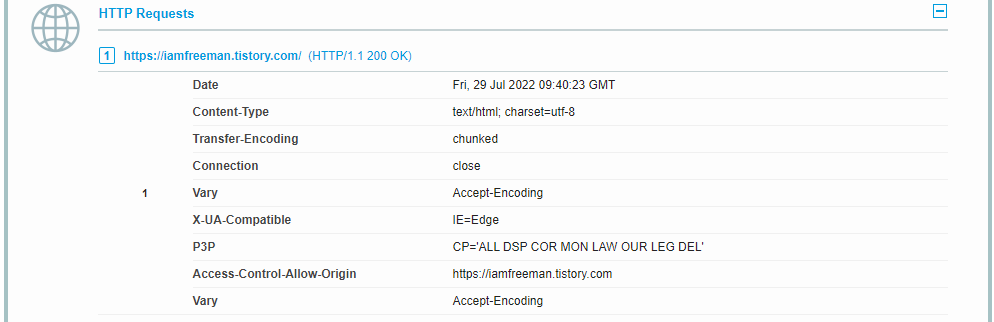
HTTP Requests
HTTP 요청 정보들을 보여줍니다.
Miscellanceous
테스트 날짜와 경과시간 등의 정보를 보여줍니다.

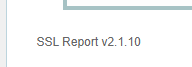
SSL Report v2.1.10
해당 Report를 만드는데 사용된 버전이 2.1.10이라는 군요.
사이트 접속 주소
Qualys SSL Labs. SSL Server Test : https://www.ssllabs.com/ssltest/
SSL Server Test (Powered by Qualys SSL Labs)
SSL Server Test This free online service performs a deep analysis of the configuration of any SSL web server on the public Internet. Please note that the information you submit here is used only to provide you the service. We don't use the domain names or
www.ssllabs.com
브라우저 TLS 1.0, TLS 1.1 프로토콜 지원 중단
주요 브라우저별 TLS 1.0/1.1 통신 지원 중지 관련하여 브라우저사별 TLS 1.0/1.1 지원 중단 버전이 공지 되었습니다.
서버에서 TLS 프로토콜 설정을 하지 않으신 경우, 웹페이지 오류가 발생할 수 있으니 서버에서 TLS 프로토콜 설정을 반드시 진행하시기 바랍니다.
[브라우져별 TLS 1.0, TLS 1.1 중단 버전]
| 브라우저 | TLS 종료 일정 |
| Chrome | Chrome 84.0.4147.89 (공식 빌드) |
| IE11 Edge |
Microsoft Edge 84.0.522.40 (공식 빌드) Microsoft 11 (2020년 9월 예정) |
| Safari | 중단 예정 (공식 일정 미발표) |
| Firefox | Firefox 78.0 |
[서버별 TLS 지원 버전]
| 웹서버 | 서버 조건 |
| Apache | Apache 2.2x 이상 / Openssl 1.0.1 이상 |
| IIS | Window Server 2008 R2 이상 |
| Webtob | 제조사 문의 필요 |
| Tomcat | Tomcat 7 이상 / Java 1.7 이상 |
| OHS | OHS 10.1.2.0.2 / Openssl 1.0.1 이상 |
| IHS | IHS 8.0 이상 / Openssl 1.0.1 이상 |
| Nginx | Openssl 1.0.1 이상 |
| Iplanet | Oracle iPlanet Web Server 7.0.21 |
| lighttpd | lighttpd 1.4.48 이상 / Openssl 1.0.1 이상 |
| 기타 서버 및 방화벽 | 제조사 문의 |
TLS 프로토콜 버전 설정 방법 (취약점 조치)
- 취약한 프로토콜/설정
- 결과적으로 TLSv1.2(서버에 따라 TLSv1.3 까지)만 사용하도록 설정해야 합니다.
- 취약 설정은 보안 취약점이 발견될 때마다 추가/수정됩니다. - 취약 설정 : SSLv2, SSLv3, TLSv1, TLSv1.1
- 취약 사유 1 : DROWN, POODLE 취약점으로 인해 차단 권장 (SSLv2, SSLv3)
- 취약 사유 2 : 브라우저/OS 사의 요구로 인한 차단 권장 (TLSv1, TLSv1.1) - 권장 TLS Protocol 설정 기준
- Mozilla 재단에서 제시한 “Intermediate compatibility” 설정 (2020.01.14 버전)
- 참고 링크 : https://wiki.mozilla.org/Security/Server_Side_TLS
Security/Server Side TLS - MozillaWiki
Recommended configurations The Mozilla SSL Configuration Generator Mozilla maintains three recommended configurations for servers using TLS. Pick the correct configuration depending on your audience: Modern: Modern clients that support TLS 1.3, with no nee
wiki.mozilla.org
Apache 서버에 대한 TLSv, SSLv 설정 방법
설정 위치
SSL이 적용된 conf 파일의 VIrtualHost부분에 권장 설정 추가 or 수정
Apache httpd. (일반적인) 설정 경로

[spluspkg@SPAYPLUSAPP01 :/etc/httpd/conf.d]$ pwd
/etc/httpd/conf.d
[spluspkg@SPAYPLUSAPP01 :/etc/httpd/conf.d]$ ls -ltra
합계 40
-rw-r--r--. 1 root root   824 11월 15  2016 welcome.conf
-rw-r--r--. 1 root root  1252 11월 15  2016 userdir.conf
-rw-r--r--. 1 root root  2926 11월 15  2016 autoindex.conf
-rw-r--r--. 1 root root   366 11월 15  2016 README
-rw-r--r--. 1 root root   625  2월 18  2017 php.conf
drwxr-xr-x. 5 root root    86  3월 27  2017 ..
-rwx------. 1 root root    32  6월 10  2020 ssl_pass.sh
-rw-r--r--. 1 root root 10143  6월 10 18:38 ssl.conf
drwxr-xr-x. 2 root root  4096  6월 10 18:38 .
[spluspkg@SPAYPLUSAPP01 :/etc/httpd/conf.d]$
설정 방법
#   SSL Protocol support:
# List the enable protocol levels with which clients will be able to
# connect.  Disable SSLv2 access by default:
SSLProtocol all -SSLv3 -TLSv1 -TLSv1.1

#   SSL Cipher Suite:
#   List the ciphers that the client is permitted to negotiate.
#   See the mod_ssl documentation for a complete list.
SSLCipherSuite ALL:+HIGH:+MEDIUM:!SSLv2:!PSK:!SRP:!ADH:!AECDH:!EXP:!RC4:+SHA
Apache 서버에 대한 SSLv, TLSv 설정예
##
## SSL Virtual Host Context
##

<VirtualHost _default_:443>

# General setup for the virtual host, inherited from global configuration
DocumentRoot "/home/spluspkg/work/www"
ServerName blabla.com:443

# Use separate log files for the SSL virtual host; note that LogLevel
# is not inherited from httpd.conf.
ErrorLog logs/ssl_error_log
TransferLog logs/ssl_access_log
LogLevel warn

#   SSL Engine Switch:
#   Enable/Disable SSL for this virtual host.
SSLEngine on

#   SSL Protocol support:
# List the enable protocol levels with which clients will be able to
# connect.  Disable SSLv2 access by default:
SSLProtocol all -SSLv3 -TLSv1 -TLSv1.1

#   SSL Cipher Suite:
#   List the ciphers that the client is permitted to negotiate.
#   See the mod_ssl documentation for a complete list.
SSLCipherSuite ALL:+HIGH:+MEDIUM:!SSLv2:!PSK:!SRP:!ADH:!AECDH:!EXP:!RC4:+SHA

#   Speed-optimized SSL Cipher configuration:
#   If speed is your main concern (on busy HTTPS servers e.g.),
#   you might want to force clients to specific, performance
#   optimized ciphers. In this case, prepend those ciphers
#   to the SSLCipherSuite list, and enable SSLHonorCipherOrder.
#   Caveat: by giving precedence to RC4-SHA and AES128-SHA
#   (as in the example below), most connections will no longer
#   have perfect forward secrecy - if the server's key is
#   compromised, captures of past or future traffic must be
#   considered compromised, too.
#SSLCipherSuite RC4-SHA:AES128-SHA:HIGH:MEDIUM:!aNULL:!MD5
#SSLHonorCipherOrder on

#   Server Certificate:
# Point SSLCertificateFile at a PEM encoded certificate.  If
# the certificate is encrypted, then you will be prompted for a
# pass phrase.  Note that a kill -HUP will prompt again.  A new
# certificate can be generated using the genkey(1) command.
#SSLCertificateFile /home/spluspkg/cert/star_payncert_com_cert.pem
SSLCertificateFile /home/spluspkg/cert/20220610/File_Wildcard.payncert.com_crt.crt

#   Server Private Key:
#   If the key is not combined with the certificate, use this
#   directive to point at the key file.  Keep in mind that if
#   you've both a RSA and a DSA private key you can configure
#   both in parallel (to also allow the use of DSA ciphers, etc.)
#SSLCertificateKeyFile /home/spluspkg/cert/star_payncert_com_key.pem
SSLCertificateKeyFile /home/spluspkg/cert/20220610/KeyFile_Wildcard.payncert.com_crt.key

#   Server Certificate Chain:
#   Point SSLCertificateChainFile at a file containing the
#   concatenation of PEM encoded CA certificates which form the
#   certificate chain for the server certificate. Alternatively
#   the referenced file can be the same as SSLCertificateFile
#   when the CA certificates are directly appended to the server
#   certificate for convinience.
#SSLCertificateChainFile /home/spluspkg/cert/Chain_RootCA_Bundle.crt
SSLCertificateChainFile /home/spluspkg/cert/20220610/ChainFile_ChainBundle.crt


#   Certificate Authority (CA):
#   Set the CA certificate verification path where to find CA
#   certificates for client authentication or alternatively one
#   huge file containing all of them (file must be PEM encoded)
#SSLCACertificateFile /home/spluspkg/cert/Chain_RootCA_Bundle.crt
SSLCACertificateFile /home/spluspkg/cert/20220610/CA_GLOBALSIGN_ROOT_CA.crt
JBoss Web 서버에 대한 TLSv, SSLv 설정 방법
설정 위치
사용자의 설치 위치마다 다르겠지만, 저의 경우에 설정파일 (standalone.xml)의 위치는 다음과 같습니다.
- /jboss/domains/jboss_was11/configuration/standalone.xml
- 다음의 설정 추가 : protocol="TLSv1.2"
protocol="TLSv1.2"
JBoss SSLv, TLSv 설정예
<subsystem xmlns="urn:jboss:domain:web:1.1" default-virtual-server="default-host" instance-id="${jboss.jvmRoute}" native="false">
	<configuration>
		<jsp-configuration x-powered-by="false"/>
	</configuration>
	<connector name="http" protocol="HTTP/1.1" scheme="http" socket-binding="http"/>
	<connector name="ajp" protocol="AJP/1.3" scheme="http" socket-binding="ajp"/>
	<connector name="https" protocol="HTTP/1.1" scheme="https" socket-binding="https" secure="true">
	<ssl name="ssl"
		 password="*****"
		 certificate-key-file="${jboss.server.base.dir}/ssl/invusomuch_com.jks"
		 sucipher-suite="TLS_ECDHE_RSA_WITH_AES_128_CBC_SHA256, TLS_ECDHE_RSA_WITH_AES_128_CBC_SHA, TLS_ECDHE_ECDSA_WITH_AES_256_CBC_SHA384, TLS_ECDHE_ECDSA_WITH_AES_256_CBC_SHA, TLS_RSA_WITH_AES_128_CBC_SHA256, TLS_RSA_WITH_AES_128_CBC_SHA, TLS_RSA_WITH_AES_256_CBC_SHA256, TLS_RSA_WITH_AES_256_CBC_SHA, TLS_RSA_WITH_AES_128_CBC_SHA, TLS_DHE_DSS_WITH_AES_128_CBC_SHA, TLS_RSA_WITH_AES_256_CBC_SHA"
		 protocol="TLSv1.2"/>
	</connector>
	<virtual-server name="default-host" enable-welcome-root="false">
		<alias name="localhost"/>
		<alias name="example.coacm"/>
		<access-log pattern="%a %t %H %p %U %s %T">
			<directory path="access"/>
		</access-log>
	</virtual-server>
</subsystem>
Oracle Http Server에 대한 TLSv 설정 방법
설정 위치
ssl.conf 파일의 SSL이 적용된 virtualhost부분에 TLSv에 대한 설정을 수정/추가 해주세요.
SSLProtocol all -TLSv1 -TLSv1.1
Oracle Http Server의 TLSv 설정예
<VirtualHost *:4463> #OHS_SSL_VH
	<IfModule ossl_module>
    	SSLEngine on

        SSLVerifyClient None
        SSLProtocol All -TLSv1 -TLSv1.1
        SSLCipherSuite	ECDHE-ECDSA-AES128-GCM-SHA256:BLABLABLABLABLABLABLABLABLABLABLABLABLABLA

        SSLCRLCheck Off
         #Path to the wallet
         SSLWallet "${ORACLE_INSTANCE}/config/fmwconfig/components/${COMPONENT_TYPE}/instances/${COMPONENT_NAME}/keystores/default"

         <FilesMatch "\.(cgi|shtml|phtml|php)$">
         	SSLOptions +StdEnvVars
         </FIlesMatch>
         ...
IBM Http Server에 대한 TLSv, SSLv 설정 방법
설정 위치
httpd.conf 파일의 SSL이 적용된 virtualhost부분에 TLSv, SSLv에 대한 설정을 수정/추가 해주세요.
SSLProtocolDisable SSLv2
SSLProtocolDisable SSLv3
SSLProtocolDisable TLSv10
SSLProtocolDisable TLSv11
IBM Http Server의 TLSv 설정예
<VirtualHost www.test.com:8443>
    SSLEnable
    ServerAdmin webmaster@kicassl.com
    DocumentRoot "C:Program Files (x86)/IBM/HTTPServer/htdocs/"
    ServerName www.test.com:8443
    SSLCipherSpec TLS_RSA_WITH_AES_256_CBC_SHA
    ErrorLog logs/ssl_error.log
    CustomLog logs/ssl_access.log combined


    SSLProtocolDisable SSLv2
    SSLProtocolDisable SSLv3
    SSLProtocolDisable TLSv10
    SSLProtocolDisable TLSv11
</VirtualHost>
Nginx (OpenSSL 1.0.1 이상) Server에 대한 TLSv 설정 방법
설정 위치
nginx.conf 파일의 SSL이 적용된 server 설정 부분에 TLSv에 대한 설정을 수정/추가 해주세요.
ssl_protocols TLSv1.2;

# NginX 버전이 1.17.0 이상인 경우
ssl_protocols TLSv1.2 TLSv1.3
Nginx Server TLSv 설정예
server {
	listen 443 ssl http2;
    listen [::]:443 ssl http2;

    ssl_certificate /path/to/signed_cert_plus_intermediates;
    ssl_certificate_key /path/to/private_key
    ssl_session_timeout 1d;
    ssl_session_cache shared:MoxSSL:10m;  # about 40000 sessions
    ssl_ssion_tickets off;

    ssl_dhparam /path/to/dhparam.pem;

    ssl_protocols TLSv1.2;

    # NginX 버전이 1.17.0 이상인 경우
    ssl_protocols TLSv1.2 TLSv1.3

    ssl_ciphers ECDHE-ECDSA-AES128-GCM-SHA256:ECDHE-RSA-AES128-GC.......
참고 링크 : https://mozilla.github.io/server-side-tls/ssl-config-generator/
Redirecting to ssl-config.mozilla.org...
mozilla.github.io
IIS (Win 2008 R2 이상) Server에 대한 TLSv 설정 방법
설정 위치 : 레지스트리 2곳
- (HKEY_LOCAL_MACHINE\SYSTEM\CurrentControlSet\Control\SecurityProviders\SCHANNEL\Protocols\TLS 1.2\server)
- (HKEY_LOCAL_MACHINE\SYSTEM\CurrentControlSet\Control\SecurityProviders\SCHANNEL\Protocols\TLS 1.2\client)
DisabledByDefault [Value = 0]
Enabled [Value = 1]
위의 레지스트리 2곳에 키 값을 모두 생성해줍니다.
이후 나머지 폴더 (TLS 1.1, TLS 1.0 등)의 Ebanled 값은 0으로 수정하여 최종적으로 TLSv1.2만 사용하도록 설정합니다.

Tomcat (Java 1.7 이상) Server에 대한 TLSv 설정 방법
설정 위치
server.xml 파일의 SSL이 적용된 connector 설정 부분에 TLSv에 대한 설정을 수정/추가 해주세요.
sslEnabledProtocols="TLSv1.2"
Tomcat Server TLSv 설정예
<!-- Secure public HTTPS/SSL connector -->
<Connector port="8321" maxHttpHeaderSize="20480" URIEncoding="UTF-8" scheme="https" secure="true" SSLEnabled="true"
	clietnAuth="false" useServerCipherSuitesOrder="true" compression="on"
    compressableMimeType="text/html,text/xml,text/csv,text/css,text/javascript"
    keystoreFile="conf/.keystore"
    sslEnabledProtocols="TLSv1.2"
    ciphers="ALL:!aNULL:!ADH:!eNULL:!LOW:!EXP:!DES:!3DES:
    	!TLS_DHE_RSA_WITH_AES_128_CBC_SHA:
        !TLS_DHE_RSA_WITH_AES_128_CBC_SHA256:
        !TLS_DHE_RSA_WITH_AES_128_GCM_SHA256:
        !TLS_DHE_RSA_WITH_3DES_EDE_CBC_SHA:
        RC4+RSA:+HIGH:+MEDIUM"
/>
Weblogic (Java 1.7 이상) Server에 대한 TLSv 설정 방법
설정 위치
설정 파일의 WebLogic 시작 매개 변수에 아래와 같이 TLSv에 대한 설정을 수정/추가 해주세요.
-Dweblogic.security.SSL.minimumProtocolVersion=TLSv1.2WebtoB Server에 대한 TLSv 설정 방법
설정 위치
설정 파일의 WebtoB의 config 설정에 아래와 같이 TLSv에 대한 설정을 수정/추가 해주세요.
CertificateFile = "경로/키_인증서_병합한파일명.pem",
CertificateKeyFile = "경로/키_인증서_병합한파일명.pem"
Protocol = "-SSLv3 -TLSv1 -TLSv1.1",
RequiredCiphers = "ALL:!ADH:!EXPORT56:RC4+RSA:!SHA:+HIGH:+MEDIUM:+LOW:+SSLv2:+EXP:+eNULL"
'Development > 리눅스' 카테고리의 다른 글
| curl: (1) Protocol "https" not supported or disabled in libcurl (0) | 2023.02.20 |
|---|---|
| 리눅스 date 명령어를 이용한 시간 확인 및 설정하기 (hwclock 포함) (2) | 2022.10.24 |
| 리눅스 OS, Apache, Tomcat, Java, Mysql, Postgres, PPAS, Oracle 버전 확인 방법 (0) | 2022.01.24 |
| 리눅스 OS 버전, bit 확인하기 (OS & version, cpu, bit check) (0) | 2022.01.24 |
| grep 옵션 사용 방법 (리눅스 grep usage help, regexp 정규식 표현) (0) | 2021.12.07 |


댓글